Adding Clinical Information
Clinical information such as allergies, intolerances, reactions, and medical conditions can be added to the Patient Folder as you become aware of them during patient consultations. This can be done at Intake, if Clinical Review is enabled, or from the Patient Folder.
Select the applicable tab to learn about adding clinical information in your province.
If your pharmacy does not have Provincial Prescription Management (PPM) enabled, refer to the Other Provinces tab on this page.
Allergies and Conditions can be added and transmitted to the EHR so other healthcare professionals can access this information. In Propel Rx, there are different types of clinical information records, but not all can be transmitted to the EHR; unsupported types are saved locally only.
In Propel Rx, the following types of records can be transmitted to the EHR:
-
Medical Allergy
-
Allergy Groups
-
Non-Medical Allergy
-
Conditions
-
Reactions
-
Custom types entered in More (…) > List Maint > Conditions
In Propel Rx, the type is chosen from the Medical Condition Search window when an allergy or condition is added.
On the EHR, the above records are categorized as either:
-
Clinical Condition – these are Conditions or Allergies that had no drug associated to them.
-
Adverse Drug Reaction (ADR) – these are Allergies that had a drug associated to them.
For more information on sending Allergies and Conditions to the EHR, refer to the Submitting Allergies and Conditions to the EHR section of the British Columbia PPM User Guide.
For information on adding clinical information locally, refer to the Other Provinces tab.
If your pharmacy does not have Real-Time Integration (RTI) enabled, refer to the Other Provinces tab on this page.
Allergies and Intolerances can be added from the Patient Folder Clinical tab and transmitted to the EHR so other healthcare professionals can access this information. If an Allergy or Intolerance is not supported by the EHR, it can still be saved locally. Medical Conditions can only be saved locally.
For an Allergy or Intolerance to be transmitted to the EHR, the Type and Sub-Type must be supported by the EHR. The Type is chosen in the Medical Condition Search window. EHR Types include:
-
Allergy Group
-
Medical Allergy
-
Non-Medical Allergy
The Sub-Type is chosen in the Details window after a Type is selected. Transmissible Sub-Types are listed with an EHR label and include:
-
Drug Allergy
-
Drug Non-Allergy Intolerance
-
Environment Allergy
-
Food Allergy
-
Environmental Non-Allergy Intolerance
-
Food Non-Allergy Intolerance
For Drug Allergy and Drug Non-Allergy Intolerance Sub-Types, the Allergen must be associated with a valid backend FDB Allergen code. If such a code does not exist for the Type (e.g., custom entry in List Maintenance), a validation error will appear upon selecting OK in the Details window. To proceed with adding the Allergy/Intolerance, a different Sub-Type must be chosen.
For more information on sending Allergies and Intolerances to the EHR, refer to the Clinical Information section of the Alberta RTI User Guide.
For information on adding clinical information locally, refer to the Other Provinces tab.
In Saskatchewan, Allergies and Intolerances can be added locally in Propel Rx or transmitted to the EHR as well. Select the dropdown below for a list of transmissible types. All other clinical information cannot be transmitted to the EHR but can be added locally.
Allergies and Intolerances that can be transmitted to the EHR include:
-
Allergy Group
-
Drug Allergy
-
Drug Non-Allergy Intolerance
-
-
Non-Medical Allergy Group
-
Food Allergy
-
Environmental Allergy
-
Food Non-Allergy Intolerance
-
Environmental Non-Allergy Intolerance
-
Allergies and Intolerances can be sent to the EHR from the following locations.
To add Allergies or Intolerances to the EHR from Intake:
-
From the Workbench, Patient Profile, or Fax tile, select Intake.
-
Search for and select the patient, if they are not already entered.
-
Select the Clinical tab.
-
Select the Add button
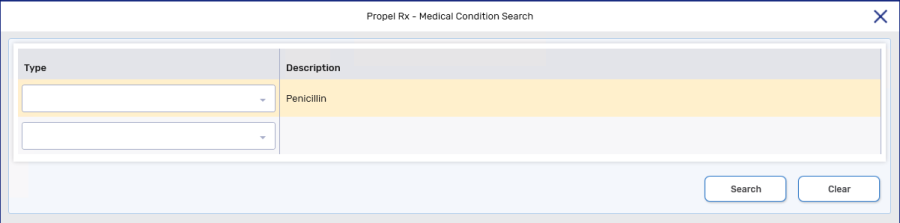
 . The Medical Condition Search window appears.
 -
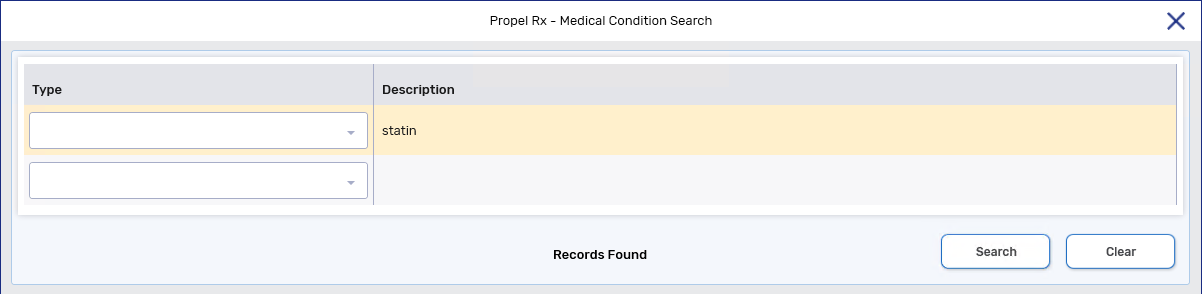
In the Description field, enter the Allergy or Intolerance.
-
Select Search. Matching results display in the bottom portion of the window.
-
Highlight the appropriate record.
-
Select OK. The Medical Condition Search window closes and the Details window appears.
For more information about this window, see the Clinical Information Details Window Overview below.
-
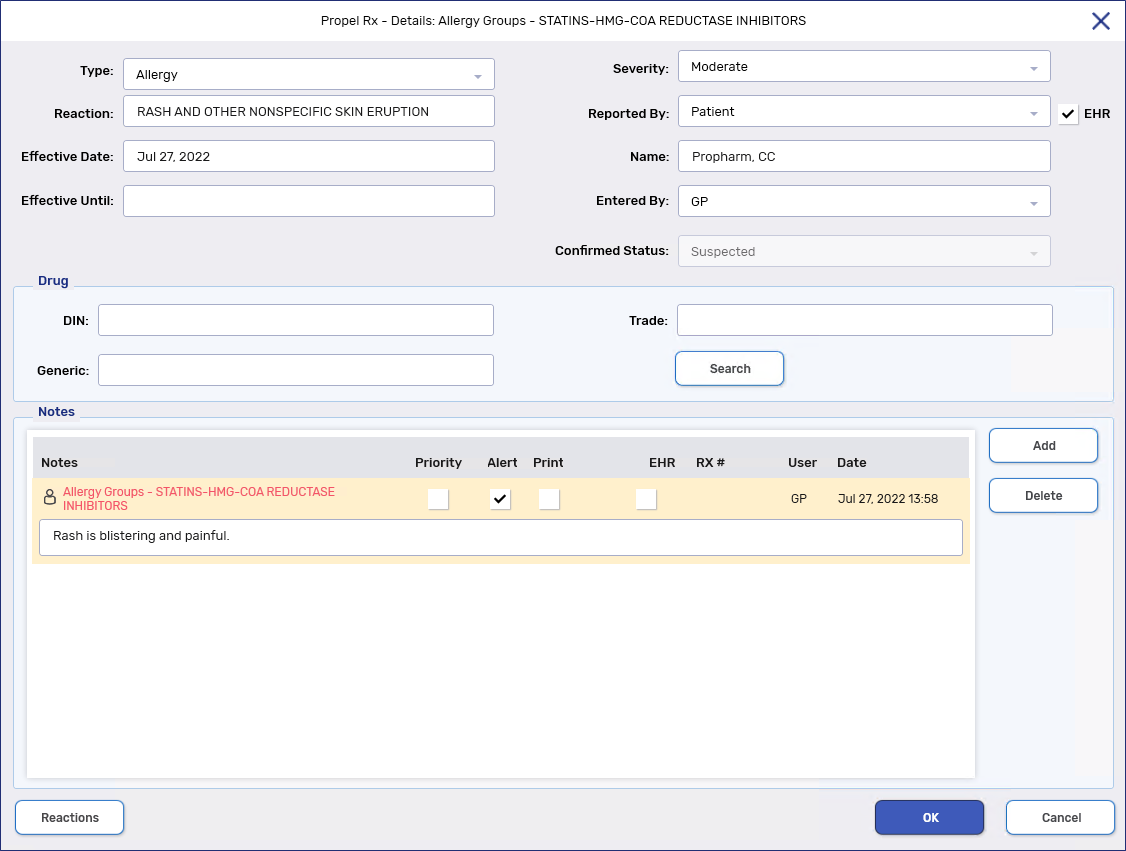
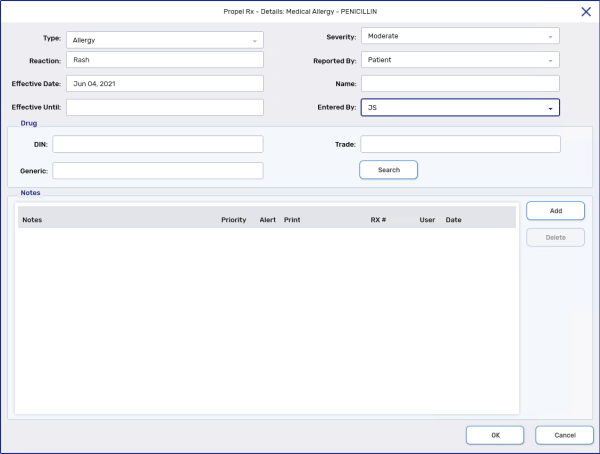
Enter or select the following information:
-
Type
-
Severity
-
Reaction
-
Reported By
-
EHR - deselect this checkbox if you only want to save the information locally. This checkbox is only enabled for Allergy Groups and Non-Medical Allergies. All other Medical Types cannot be transmitted to the EHR.
-
Confirmed Status - indicate if an intolerance is suspected or confirmed.
-
-
Optional: In the Drug section, link a drug to the record by searching for the DIN, generic name, or trade name. The drug is not required for transmission to the EHR.
-
Optional: Under the Notes section, add any notes, if applicable. Select the following checkboxes if they apply.
-
Priority - if you want the note to pop up as an alert when opening the Patient Folder or processing a prescription in Rx Detail. If you already viewed the pop up when opening the Patient Folder, it does not display again in Rx Detail.
-
Alert - if you want the note to appear in the Rx Detail Alerts section when processing a prescription.
-
Print - if you want the note to print under the Notes/Alerts section of the Half label or if Digital Workflow is enabled, appear under the Clinical Review Notes tab.
-
EHR - if you want to transmit the note to the EHR. By default, this checkbox is ON if the EHR checkbox for the overall record is on.
-
-
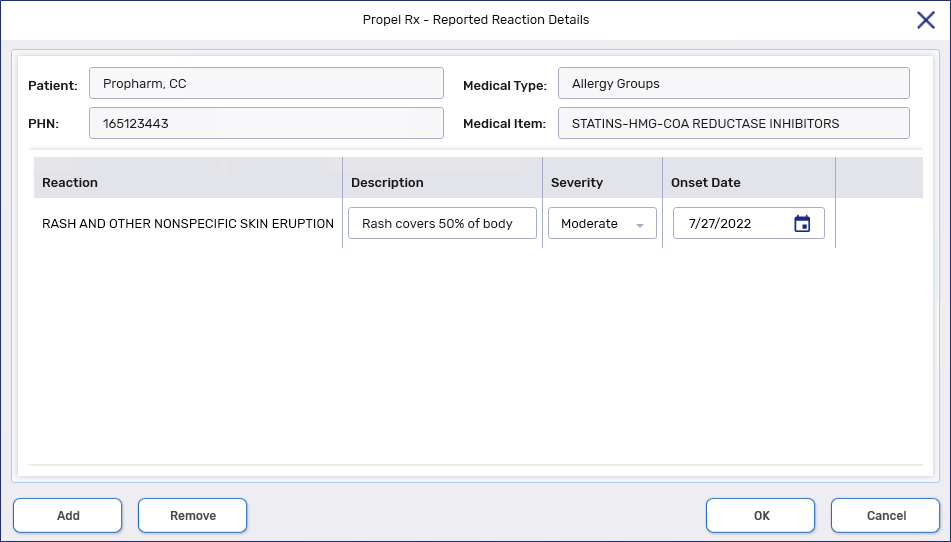
Optional: Select the Reactions button. The Reported Reaction Details window opens.
-
Select Add to add additional reactions. If multiple reactions are added, the Reaction field in the Details window displays "SEE REACTIONS."
-
Highlight a reaction and select Remove to delete it.
-
-
Select OK. If the EHR checkbox was selected, a prompt appears for you to choose the type of record being transmitted. Make the appropriate choice and select OK.
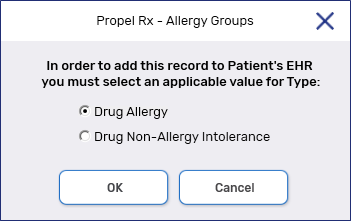
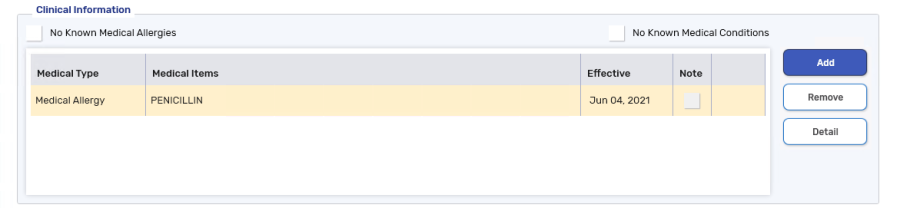
The window closes. The window closes and the record is added to the Patient Folder Clinical tab.
To add Allergies and Intolerances to the EHR from the Patient Folder:
-
Open the Patient Folder.
-
Select the Clinical tab.
-
In the Clinical Information section, select Add. The Medical Condition Search window appears.
-
In the Description field, enter the medical condition.
-
Select Search. Matching results display in the bottom portion of the window.
-
Highlight the appropriate record.
-
Select OK. The Medical Condition Search window closes and the Details window appears.
-
Enter or select the following information:
-
Type
-
Severity
-
Reaction
-
Reported By
-
EHR - deselect this checkbox if you only want to save the information locally. This checkbox is only enabled for Allergy Groups and Non-Medical Allergies. All other Medical Types cannot be transmitted to the EHR.
-
Confirmed Status - indicate if an intolerance is suspected or confirmed.
-
-
Optional: In the Drug section, link a drug to the record by searching for the DIN, generic name, or trade name. The drug is not required for transmission to the EHR.
-
Optional: Under the Notes section, add any notes, if applicable. Select the following checkboxes if they apply.
-
Priority - if you want the note to pop up as an alert when opening the Patient Folder or processing a prescription in Rx Detail. If you already viewed the pop up when opening the Patient Folder, it does not display again in Rx Detail.
-
Alert - if you want the note to appear in the Rx Detail Alerts section when processing a prescription.
-
Print - if you want the note to print under the Notes/Alerts section of the Half label or if Digital Workflow is enabled, appear under the Clinical Review Notes tab.
-
EHR - if you want to transmit the note to the EHR. By default, this checkbox is ON if the EHR checkbox for the overall record is on.
-
-
Optional: Select the Reactions button. The Reported Reaction Details window opens.
-
Select Add to add additional reactions. If multiple reactions are added, the Reaction field in the Details window displays "SEE REACTIONS."
-
Highlight a reaction and select Remove to delete it.
-
-
Select OK. If the EHR checkbox was selected, a prompt appears for you to choose the type of record being transmitted. Make the appropriate choice and select OK.
The window closes.
-
Select Save.
-
The record is added to the Patient Folder Clinical tab and transmitted to the EHR.

-
For information on adding clinical information locally, refer to the Other Provinces tab.
The purpose of clinical information is to ensure that related allergies, intolerances, and medical conditions are kept on file for the patient. This clinical information is shared with the DIS and all healthcare professionals that will be viewing the patient's EHR. Therefore, it is imperative that you keep this clinical information as up to date as possible.
It is necessary to update the DIS with local information, as each pharmacy in Newfoundland and Labrador is considered to be the source system to the Client Registry.
The following medical condition types can be uploaded to or downloaded from the EHR:
-
Allergy Groups
-
Medical Allergies
-
Conditions
-
Non-Medical Allergies
-
Reactions
For more information on sending clinical information to the DIS, see the Clinical Information section of the Newfoundland and Labrador DIS User Guide.
For information on adding clinical information locally, refer to the Other Provinces tab.
Any information entered in the Patient Folder Clinical tab is not transmitted to the patient's EHR Profile, but it is imperative that you keep this information up-to-date locally. For steps on how to enter this information, refer to the Other Provinces tab on this page.
Clinical information such as allergies, intolerances, reactions, and medical conditions can be maintained in the Patient Folder Clinical tab and transmitted to the DIS. It is imperative that you keep this clinical information as up-to-date as possible on the patient's EHR.
In Propel Rx, the following Medical Condition Types can be transmitted to the DIS:
-
Allergy Group
-
Medical Allergy
-
Condition ICD-10
All other types will have the EHR checkbox OFF and disabled.
For more information on sending clinical information to the EHR, see the Clinical Information on the EHR section of the Nova Scotia DIS User Guide.
For information on adding clinical information locally, refer to the Other Provinces tab.
To add clinical information from Intake:
-
From the Workbench, Patient Profile, or Fax tile, select Intake.
-
Search for and select the patient, if they are not already entered.
-
Select the Clinical tab.
-
Select the Add button
. The Medical Condition Search window appears. -
In the Description field, enter the medical condition (e.g., allergy, intolerance, reaction, condition).
-
Select Search. Matching results display in the bottom portion of the window.
-
Highlight the appropriate record.
-
Select OK. The Medical Condition Search window closes and the Details window appears.
For more information about this window, see the Clinical Information Details Window Overview below.
-
Enter the following information:
-
Type
-
Reported By
-
-
Optional - Dropdown the Severity field and select the appropriate option.
-
Optional - In the Reaction field, enter details of the patient's reaction, if applicable. This is a free-form text field.
-
Optional - If the clinical information was provided by someone other than the patient, you can enter their name in the Name field. This is a free-form text field.
-
Optional - In the Drug section, link a drug to the record by searching for the DIN, generic, or trade name.
-
Under the Notes section, add any notes, if applicable. Select the following checkboxes if they apply.
-
Priority - if you want the note to pop up as an alert when opening the Patient Folder or processing a prescription in Rx Detail. If you already viewed the pop up when opening the Patient Folder, it does not display again in Rx Detail.
-
Alert - if you want the note to appear in the Rx Detail Alerts section when processing a prescription.
-
Print - if you want the note to print under the Notes/Alerts section of the Half label or if Digital Workflow is enabled, appear in the Clinical Review Notes tab.
-
-
Select OK. The window closes and the record is added to the Patient Folder Clinical tab.
Watch a quick overview of adding clinical information from the Patient Folder below.
To add clinical information from the Patient Folder:
-
Select the Patient navigator button
 .
. -
Select the Clinical tab.
-
In the Clinical Information section, select Add. The Medical Condition Search window appears.
-
In the Description field, enter the medical condition (e.g., allergy, intolerance, reaction, condition).
-
Select Search. Matching results display in the bottom portion of the window.
-
Highlight the appropriate record.
-
Select OK. The Medical Condition Search window closes and the Details window appears.
For more information about this window, see the Clinical Information Details Window Overview below.
-
Enter the following information:
-
Type
-
Reported By
-
-
Optional - Dropdown the Severity field and select the appropriate option.
-
Optional - In the Reaction field, enter details of the patient's reaction, if applicable. This is a free-form text field.
-
Optional - If the clinical information was provided by someone other than the patient, you can enter their name in the Name field. This is a free-form text field.
-
Optional - In the Drug section, link a drug to the record by searching for the DIN, generic, or trade name.
-
Under the Notes section, add any notes, if applicable. Select the following checkboxes if they apply.
-
Priority - if you want the note to pop up as an alert when opening the Patient Folder or processing a prescription in Rx Detail. If you already viewed the pop up when opening the Patient Folder, it does not display again in Rx Detail.
-
Alert - if you want the note to appear in the Rx Detail Alerts section when processing a prescription.
-
Print - if you want the note to print under the Notes/Alerts section of the Half label or if Digital Workflow is enabled, appear in the Clinical Review Notes tab.
-
-
Select OK. The window closes and the record is added to the Patient Folder Clinical tab.
-
Select Save.
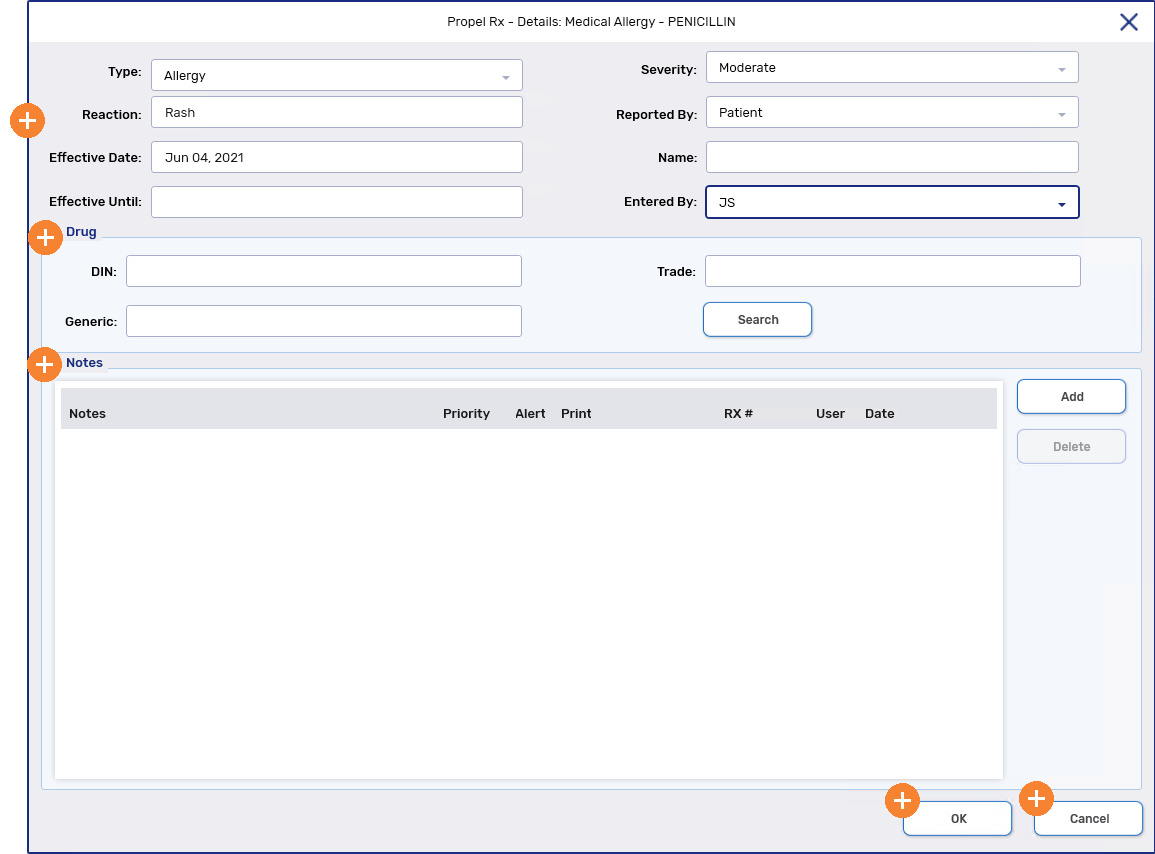
To learn more about the Clinical Information Details window, select the expander icons  in the image below.
The name of the window changes depending on the record type that was chosen in the Medical Condition Search window.